The purpose of using the RSS feed functionality is to automatically post your favorite content as soon as it is published at its native source. Now you don’t have to regularly visit the source or news channel to check whether they have published or not. Simply add the RSS feed URL in ContentStudio and automatically schedule your posting.
Following is a step by step guide on how to use RSS Feed in Contentstudio.
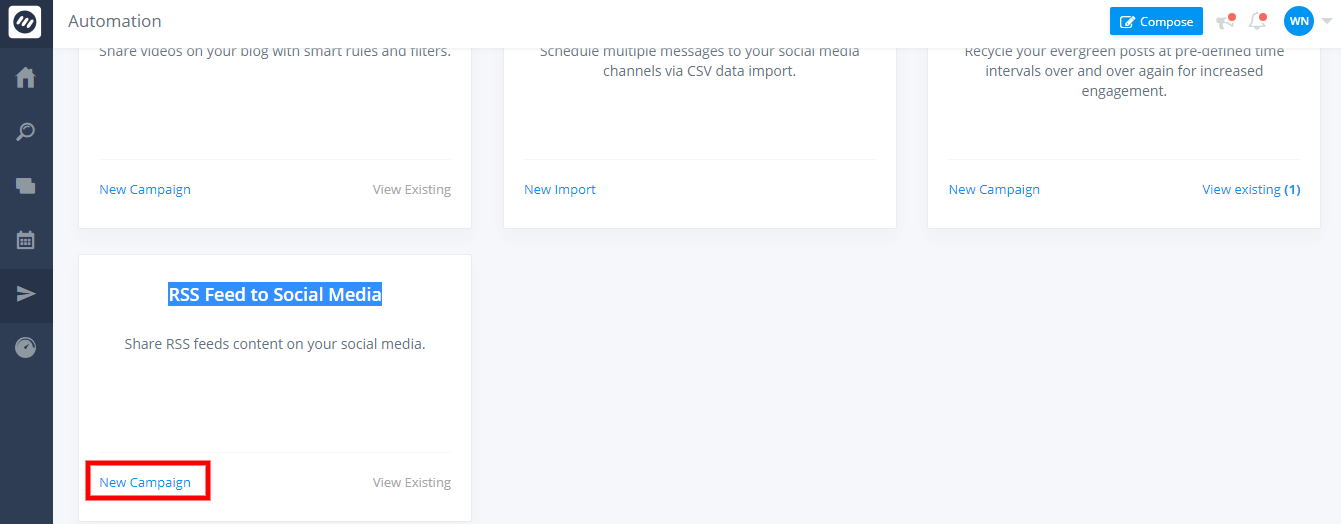
Login to your ContentStudio account and navigate to automation which is located on the left-hand toolbar of your dashboard. Scroll down to “RSS Feed to Social Media”, click on the new campaign if you haven’t already created one.
Set an appropriate name for your campaign e.g. “ContentStudio RSS Feed”

In step 2 connect your social media pages or group you want to post to.

Step 3 allows you to insert the URL to your feed and set campaign specific hashtags

The first field in step3 allows you to add the URL of your favorite feed. To extract the Feed URL from any webpage follow the steps mentioned below.
- Let’s say that you want to add the ContentStudio blog feed to your facebook page.
- Navigate to “http://blog.contentstudio.io”
- To view page source depends upon the browser you are using, but in most browsers, you’ll choose the Page Source or Source option under the View menu near the top of the window.
- You can accomplish step 3 by right-clicking on the webpage and click on view page source
- Once the window appears with the HTML for your page, use the “Find” feature (typically Ctrl-F on a PC, Command-F on a Mac) and search for RSS (without the quotes)

The RSS feed’s URL address is found between the quotes after “href=.” In this case, it would be https://blog.contentstudio.io/feed/ as highlighted in the picture above.
After you have added the URL for the feed, enter the hashtags you want to set for this campaign. You can also select custom hashtags as well as append them for this specific campaign.

Append will get your hashtag right at the end of the title of your post. Replacing a hashtag will help you replace your keywords (Social Media, Digital Marketing) with the hashtag in the title multiple times as well. (If the keywords are repeated in the title).
Scheduling your campaign
The last step of this process is scheduling your post. Contentstudio checks for new content from your RSS feed link every 30 minutes. It will then only publish the number of posts you gave per update in Step 4. See the image below.

- Post Immediately option will post your content right away soon as it is published on the main RSS feed. Queue works the same way here as well, queued content will be pushed to the next available slot for your social accounts you selected in Step 2.
- Max post per feed update needs to have the number of posts you want to be posted with each 30 minutes update.

Wasiq Naeem
Wasiq Naeem is a content and digital marketing veteran who is passionate about his writing. Extensive research and producing high-quality content is just another day at the office for him.